

Introduction
Setting up a professional WordPress website doesn’t have to be complicated. If you’ve been wondering how to install the Hello Elementor theme and get started with the powerful Elementor page builder, you’re in the right place. This comprehensive guide will walk you through every step of the installation process, from understanding the basics to activating Elementor Pro.
Whether you’re building your first website or managing multiple sites, this tutorial will help you set up one of the most popular WordPress page builders used by over 11 million websites worldwide. By the end of this guide, you’ll have a fully functional Elementor setup ready to create stunning web pages.
Understanding WordPress Themes vs. Plugins: The Foundation
Before we dive into the installation process, let’s clear up a common confusion that many WordPress beginners face: what’s the difference between a theme and a plugin?

What is a WordPress Theme?
Think of your WordPress website as a house. The theme is like the interior design of that house – it controls the colours of your walls, the style of your carpet, and the look of your curtains. In technical terms, a WordPress theme determines:
- The visual appearance of your website
- Layout and design structure
- Colour schemes and typography
- Overall aesthetic and branding
At any given time, only one theme can be active on your WordPress website. This is similar to how you can only have one interior design style in your house at once.
What is a WordPress Plugin?
Continuing with the house analogy, plugins are like the functional appliances in your home. They’re the gas stove in your kitchen, the geyser in your bathroom, the dishwasher, and the washing machine. Each plugin adds specific functionality to your website.
WordPress plugins can add features like:
- Contact forms for customer inquiries
- SEO optimization tools
- Security enhancements
- E-commerce capabilities
- Page building tools (like Elementor)
Unlike themes, you can have multiple plugins active simultaneously, each serving a different purpose on your website.

Why Choose Hello Elementor Theme?
Hello Elementor is not just another WordPress theme – it’s specifically designed to work seamlessly with the Elementor page builder. Here’s why it’s the preferred choice for millions of users:

Lightweight and Fast: Hello Elementor is one of the fastest-loading WordPress themes available. With minimal CSS and JavaScript, it ensures your website loads quickly, which is crucial for both user experience and SEO rankings.
Perfect Compatibility: Since it’s created by the same team that developed Elementor, you get 100% compatibility without any conflicts or bugs that sometimes occur with third-party themes.
Blank Canvas Approach: The theme provides a clean slate for your designs. It doesn’t impose any specific styling, allowing Elementor to have full control over your website’s appearance.
Regular Updates: Being an official Elementor product, the Hello theme receives regular updates to ensure compatibility with the latest WordPress and Elementor versions.
Step-by-Step Guide: Installing Hello Elementor Theme
Now let’s get into the practical part. Follow these steps carefully to install the Hello Elementor theme on your WordPress website.
Step 1: Access Your WordPress Dashboard
First, you need to log in to your WordPress admin area. If you’re using Hostinger (or any other hosting provider), you have two ways to access your WordPress dashboard:
Method 1 – From Hostinger Homepage:
- Log in to your Hostinger account.
- Navigate to the homepage, where you see all your websites listed.
- Click on “WordPress Admin” to directly access your dashboard.
Method 2 – From Website Section:
- Go to the “Websites” section in your Hostinger panel.
- Find your website from the list.
- Click on the “WP Admin” button.
Hostinger will automatically open your WordPress admin dashboard, saving you from manually entering login credentials each time.
Step 2: Navigate to the Themes Section
Once you’re on your WordPress dashboard, look at the left sidebar menu. Here’s how to find the themes section:
- Locate “Appearance” in the left menu.
- Click on “Appearance” to expand the submenu.
- Click on “Themes”
This will show you all the themes currently installed on your website. By default, WordPress comes with a pre-installed theme (usually the latest default WordPress theme, like Twenty Twenty-Five).
Step 3: Add a New Theme
On the Themes page, you’ll see an “Add New” button at the top. Click on it to access the WordPress theme directory. This directory contains thousands of free themes you can install with just a few clicks.
Step 4: Search and Install Hello Elementor
You have two options here:
Option 1: Use the search bar to type “Hello Elementor”
Option 2: Look for Hello Elementor in the featured themes (it’s often displayed prominently due to its popularity)
Once you locate the Hello Elementor theme card, click the “Install” button. The installation process typically takes just 30-60 seconds, depending on your internet connection speed.
Step 5: Activate Hello Elementor
After installation completes, you’ll see an “Activate” button appear on the theme card. Click it to make Hello Elementor your active theme. Remember, only one theme can be active at a time.
Step 6: Delete Unnecessary Themes
This is an important step that many beginners overlook. Having multiple unused themes installed can:
- Slow down your website.
- Create security vulnerabilities
- Use unnecessary server space.
- Make your dashboard cluttered.
To delete the default WordPress theme:
- Click on “Theme Details” on the old theme.
- Click the “Delete” button in the bottom right corner.
- Confirm the deletion
Now you should have only Hello Elementor installed and active on your website.
Installing Elementor Plugin (Free Version)
With your Hello Elementor theme active, you’ll notice a message recommending the installation of the Elementor plugin. This is the next crucial step in building your website.

What Makes Elementor Special?
Elementor is a drag-and-drop page builder that revolutionises how you create WordPress pages. Instead of dealing with complex code or limited customisation options, Elementor provides:
Visual Editing: See exactly how your page looks while you’re building it. No more switching between edit mode and preview mode.
Pre-made Elements: Access dozens of widgets (elements) like headings, images, buttons, forms, testimonials, and more. Simply drag them onto your page and customise.
Template Library: Choose from hundreds of professionally designed templates to kickstart your website design.
Responsive Design: Ensure your website looks perfect on mobile phones, tablets, and desktops with built-in responsive editing tools.
Step-by-Step: Installing Elementor Plugin
Step 1: Access the Plugins Section
From your WordPress dashboard sidebar, locate “Plugins” and click on “Add New Plugin” (or “Add New” depending on your WordPress version).
Step 2: Search for Elementor
In the search bar that appears, type “Elementor”. The official Elementor Website Builder plugin should appear at the top of the results. Make sure you’re installing the correct plugin – it should show “Elementor” as the author.
Step 3: Install and Activate
Click the “Install Now” button. Once installation completes (usually within a minute), click “Activate” to enable the plugin on your website.
Step 4: Skip the Initial Setup (For Now)
After activation, Elementor will prompt you to connect your account or create a new one. For now, you can click “Skip Setup” or “Skip” to bypass this step. We’ll create a proper account when installing Elementor Pro.
Elementor might automatically open a sample page it created. You can simply exit this page by clicking the WordPress icon in the top left corner to return to your dashboard.
Verify Installation
To confirm Elementor is properly installed:
- Go to Plugins → Installed Plugins.
- Look for “Elementor” in the list.
- Ensure it shows “Active” status.
Creating an Elementor Account and Installing Elementor Pro
While the free version of Elementor is powerful, Elementor Pro unlocks essential business features that most professional websites need, such as:
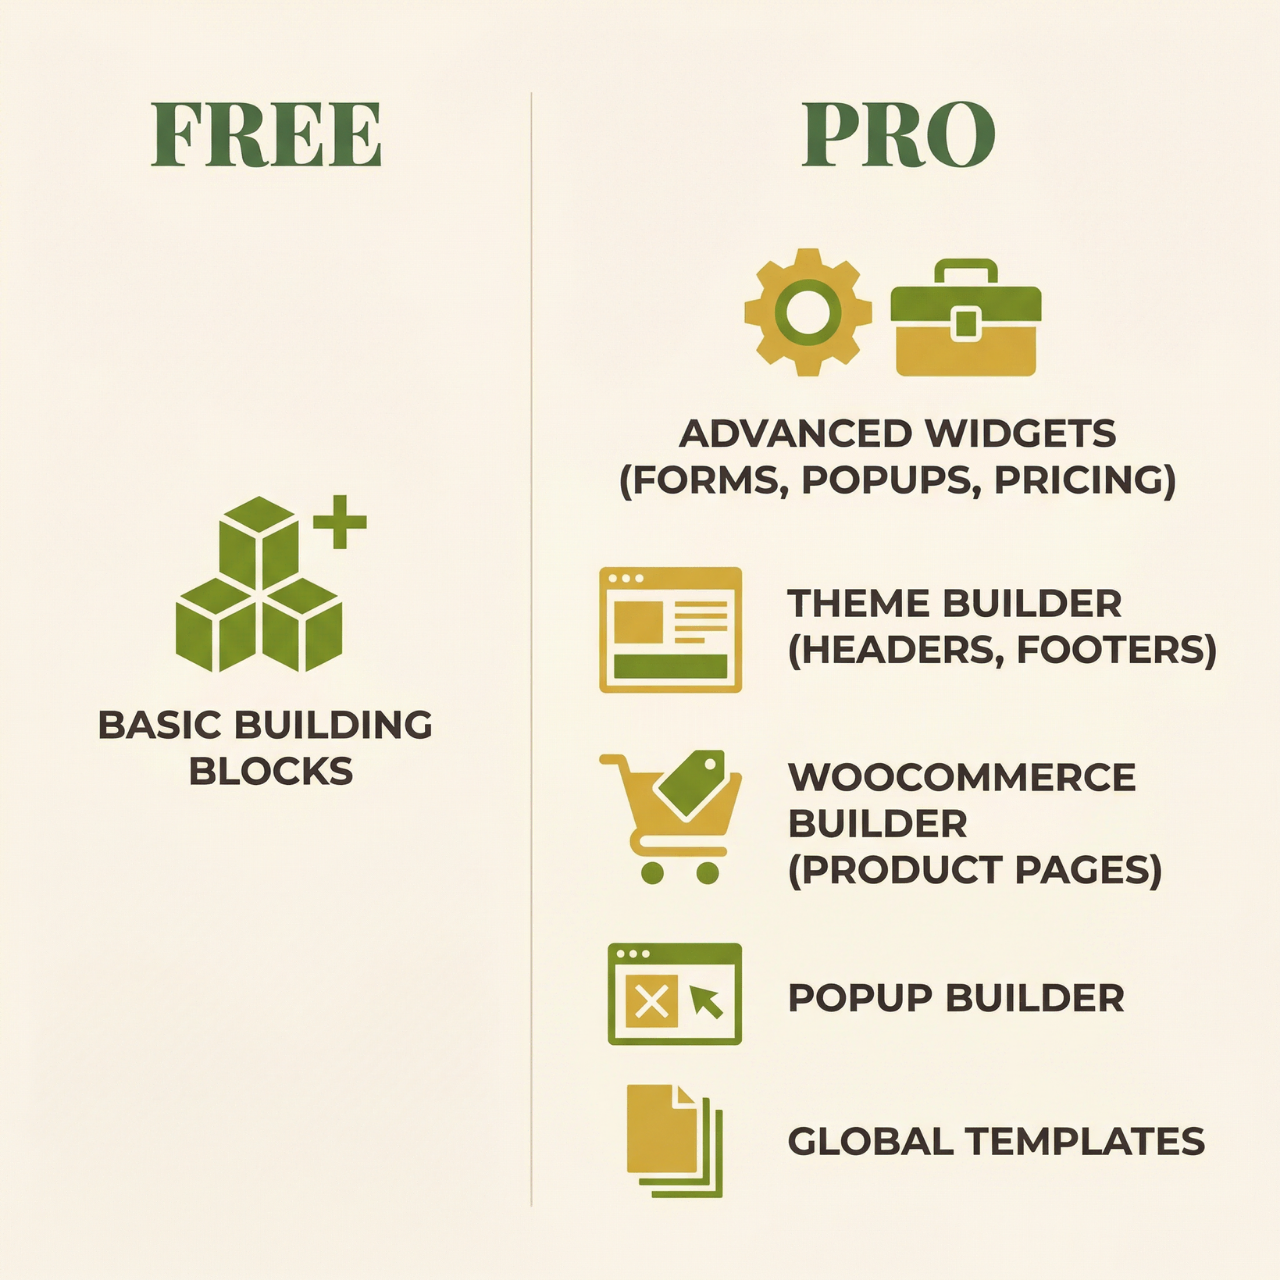
- Contact forms and form builders
- WooCommerce builders for e-commerce sites
- Theme builder to customise headers, footers, and other template parts
- Popup builder for lead generation
- Advanced widgets like pricing tables, testimonials carousel, and portfolios
- Priority support from the Elementor team
According to industry statistics, websites using Elementor Pro see an average of 40% faster development time compared to custom coding or using basic page builders.

Step-by-Step: Purchasing Elementor Pro
Step 1: Visit the Elementor Website
Navigate to elementor.com (or use the affiliate link in the video description for potential discounts).
Step 2: Access the Pricing Page
- Click on “Products” in the top navigation menu.
- Select “Elementor Website Builder” from the dropdown.
- Click “Get It Now” or “Pricing”
Step 3: Choose Your Plan
Select the plan that matches your needs. For beginners building their first website, the Advanced Solo Plan is usually sufficient.
Step 4: Create Your Elementor Account
Click “Buy Now” on your chosen plan, then:
- Click “Create Account”
- Choose your preferred signup method (Google, Facebook, Apple, or Email)
- If using email, enter your email address and create a strong password.
- Click “Create Account”
Step 5: Review Your Cart
You’ll see your selected plan in the cart. For example, the Advanced Solo Plan shows as ₹580/month when billed annually (₹6,960 per year for one website).
Important: Avoid adding unnecessary upsells or add-ons during checkout unless you specifically need them. You can always add features later if required.
Step 6: Complete Billing Information
Enter your billing details:
- First name and last name
- Complete address (required for invoicing)
- If purchasing as a company in India, add your company name and GST number for proper tax documentation.
Step 7: Payment Method
Elementor accepts:
- Credit/Debit Cards: The most common option in India. Enter your card details, including cardholder name, card number, expiry date, and CVV.
- PayPal: Available but less commonly used in India
Once you’ve entered your payment information, review everything carefully before clicking “Pay Now”.
Installing Elementor Pro Plugin
After successful payment, you’ll have access to your Elementor account dashboard. Here’s how to install Elementor Pro on your website:
Step 1: Download Elementor Pro
- Log in to your Elementor account at elementor.com
- You’ll see your dashboard with any connected websites listed.
- Look for the download arrow icon or “My Account” section.
- Click to download the Elementor Pro plugin (it will download as a .zip file)
Step 2: Upload to WordPress
Return to your WordPress dashboard:
- Go to Plugins → Add New Plugin.
- Click “Upload Plugin” at the top of the page.
- Click “Choose File”
- Navigate to your Downloads folder.
- Select the Elementor Pro .zip file you just downloaded
- Click “Open” then “Install Now”
The installation will take 1-2 minutes, depending on your internet speed.
Step 3: Activate Elementor Pro
After installation completes, click “Activate Plugin”. You’ll be prompted to connect your Elementor account.
Step 4: Connect Your Account
Click “Connect & Activate”. Elementor will attempt to automatically detect your account. If it doesn’t:
- Enter the email address you used to create your Elementor account.
- Enter your password
- Click “Connect & Activate”
Privacy Note: Elementor asks permission to collect usage data. If you prefer not to share this information, simply uncheck the data sharing box before clicking “Connect & Activate”.
Step 5: Review Your Cart
Look at your WordPress dashboard sidebar. You should now see “Elementor” as a menu item. Click on it, then click “License”. You should see your account status showing as “Active” with your plan details.
Congratulations! You now have a complete Elementor setup with both the free plugin and Pro version installed and activated.
Essential Elementor Settings to Configure Before Building
Before you start creating pages, it’s worth checking these important Elementor settings:
General Settings
Go to Elementor → Settings → General. Here, you can set the default page and post types where Elementor will be enabled.
Style Settings
Under Elementor → Settings → Style, you can disable default colours and fonts if you want complete control over your design.
Experiments
Elementor → Settings → Experiments allows you to enable beta features and optimisations. Be cautious here – only enable features you understand or that are marked as stable.
Conclusion: Your WordPress Design Journey Begins

You’ve now successfully installed the Hello Elementor theme and both versions of the Elementor plugin on your WordPress website. This powerful combination gives you everything you need to create professional, beautiful web pages without touching a single line of code.
The installation process might seem lengthy when written out, but in practice, it takes only 15-20 minutes from start to finish. The time invested in setting up these tools properly will save you hundreds of hours in the long run, as you’ll be able to design and modify pages quickly using Elementor’s intuitive drag-and-drop interface.
Remember to download the complete checklist and screenshots mentioned in the video description. Having these resources available as you work through the process ensures you won’t miss any important steps.
In the next tutorial, we’ll dive into configuring the essential Elementor settings and exploring the interface so you can start building your first page with confidence. You’re now equipped with professional-grade tools used by millions of websites worldwide – it’s time to bring your vision to life!
Ready to continue? Don’t forget to bookmark this guide for future reference, and make sure you’ve completed all the steps before moving on to the next video in the series.